2017-06-23
Maven私有仓库搭建和使用
评论(0)
浏览量(5630)
下载和安装
下载地址:
http://www.sonatype.com/nexus-repository-oss
安装:
Linux版的无需安装,直接解压即可,然后进入bin目录下,运行./nexus start,启动服务
用户界面
在地址栏里输入服务IP地址和8081端口就可以打开用户界面,例如http://192.168.2.1:8081
点Sign In登录管理页面,用户名密码为,admin和admin123
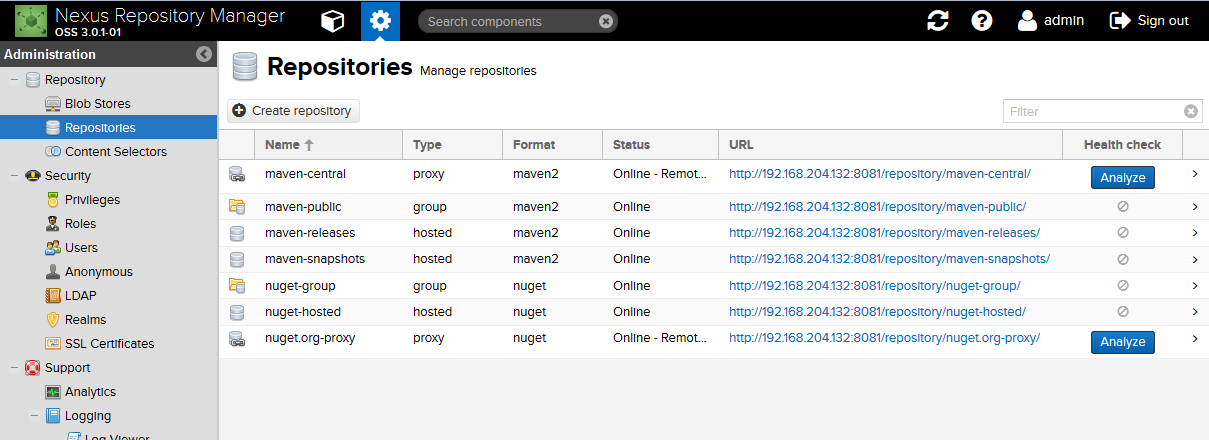
在Repositories页面里显示着,默认已经创建了5个仓库(2个为group),直接可以拿来用,无需再自行创建仓库。
使用方法
搭建Maven私有仓库的主要目的,是为了在团队多人开发时,只要内网的私有仓库有下载过依赖的jar包,就直接从私有仓库获取,不再通过外网的中央仓库,毕竟外网的下载速度实在是太慢了。
在项目的pom.xml或者settings.xml文件里加入一下配置信息(区别,pom.xml是针对当前项目,settings.xml是全局的针对所有项目)
配置信息中的id,name和url跟上图中的仓库对应,type为proxy,说明它只是代理,只能用于下载jar包,不能用于发布项目。
<repositories>
    <repository>
        <id>maven-central</id>
        <name>maven-central</name>
        <url>http://192.168.204.132:8081/repository/maven-central/</url>
        <layout>default</layout>
        <snapshotPolicy>always</snapshotPolicy>
         <releases>
            <enabled>true</enabled>
        </releases>
        <snapshots>
            <enabled>true</enabled>
        </snapshots>
    </repository>
</repositories>
如果想把自己的项目发布到私有仓库中,可以用另外两个仓库,release和snapshots,至于这两个有啥区别,说白了就是,在版本号后面加“-SNAPSHOTS“”就自动发布到snapshots,不加的话就发布到releases
发布到仓库的命令是mvn clean deploy
<distributionManagement>
        <repository>
            <id>maven-releases</id>
            <name>maven-releases</name>
            <url>http://192.168.204.132:8081/repository/maven-releases/</url>
        </repository>
        <snapshotRepository>
            <id>maven-snapshots</id>
            <name>maven-snapshots</name>
            <url>http://192.168.204.132:8081/repository/maven-snapshots/</url>
        </snapshotRepository>
    </distributionManagement>
其他使用细节
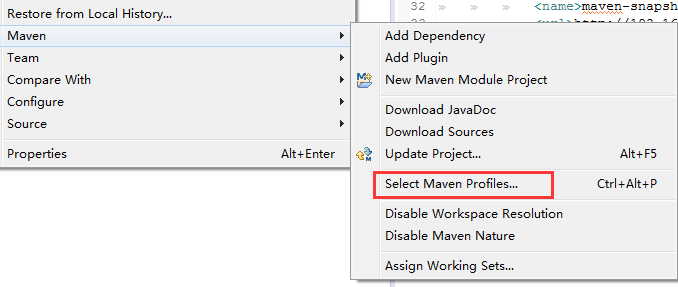
如果用的是eclipse,在settings.xml的配置如下
<profile>
      <id>localMaven</id>

      <activation>
        <jdk>localMaven</jdk>
      </activation>

      <repositories>
        <repository>
          <id>maven-central</id>
          <name>maven-central</name>
          <url>http://192.168.204.132:8081/repository/maven-central/</url>
          <layout>default</layout>
          <snapshotPolicy>always</snapshotPolicy>
          <releases>
                <enabled>true</enabled>
            </releases>
            <snapshots>
                <enabled>true</enabled>
            </snapshots>
        </repository>
      </repositories>
    </profile>
这时候记得在eclipse里选择对应的profile
发布到私有库
pom.xml中加入
<distributionManagement>
    <repository>
        <id>releases</id>
        <name>Popocloud Release Repository</name>
        <url>http://192.168.204.132:8081/nexus/content/repositories/releases/</url>
    </repository>
    <snapshotRepository>
        <id>snapshots</id>
        <name>Popocloud Snapshot Repository</name>
        <url>http://192.168.204.132:8081/nexus/content/repositories/snapshots/</url>
    </snapshotRepository>
</distributionManagement>
settings.xml中加入
  	<server>
	   <id>releases</id>
	   <username>admin</username>
	   <password>admin123</password>
	 </server>

	<server>
      <id>snapshots</id>
      <username>admin</username>
      <password>admin123</password>
    </server>
没有登录不能评论