Flume NG
Flume NG是一个分布式、可靠、可用的系统,它能够将不同数据源的海量日志数据进行高效收集、聚合、移动,最后存储到一个中心化数据存储系统中。由原来的Flume OG到现在的Flume NG,进行了架构重构,并且现在NG版本完全不兼容原来的OG版本。经过架构重构后,Flume NG更像是一个轻量的小工具,非常简单,容易适应各种方式日志收集,并支持failover和负载均衡。
架构设计要点
Flume的架构主要有一下几个核心概念:
Event:一个数据单元,带有一个可选的消息头
Flow:Event从源点到达目的点的迁移的抽象
Client:操作位于源点处的Event,将其发送到Flume Agent
Agent:一个独立的Flume进程,包含组件Source、Channel、Sink
Source:用来消费传递到该组件的Event
Channel:中转Event的一个临时存储,保存有Source组件传递过来的Event
Sink:从Channel中读取并移除Event,将Event传递到Flow Pipeline中的下一个Agent(如果有的话)
Flume NG架构
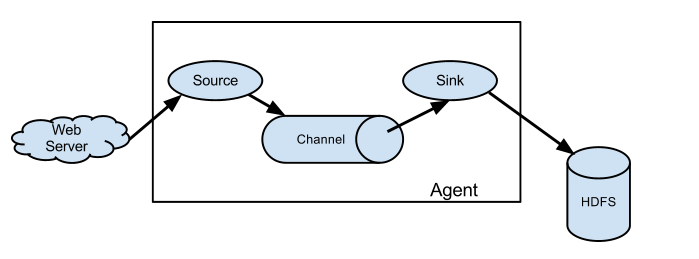
如图所示:
外部系统产生日志,直接通过Flume的Agent的Source组件将事件(如日志行)发送到中间临时的channel组件,最后传递给Sink组件,HDFS Sink组件可以直接把数据存储到HDFS集群上。
一个最基本Flow的配置,格式如下:
# List the sources, sinks and channels for the agent
<Agent>.sources = <Source1>
<Agent>.sinks = <Sink1> <Sink2>
<Agent>.channels = <Channel1> <Channel2>

# set list of channels for source (separated by space)
<Agent>.sources.<Source1>.channels = <Channel1> <Channel2>

# set channel for sinks
<Agent>.sinks.<Sink1>.channel = <Channel1>
<Agent>.sinks.<Sink2>.channel = <Channel2>

<Agent>.sources.<Source1>.selector.type = replicating
尖括号里面的,我们可以根据实际需求或业务来修改名称。下面详细说明:
表示配置一个Agent的名称,一个Agent肯定有一个名称。与是Agent的Source组件的名称,消费传递过来的Event。与是Agent的Channel组件的名称。与是Agent的Sink组件的名称,从Channel中消费(移除)Event。
上面配置内容中,第一组中配置Source、Sink、Channel,它们的值可以有1个或者多个;第二组中配置Source将把数据存储(Put)到哪一个Channel中,可以存储到1个或多个Channel中,同一个Source将数据存储到多个Channel中,实际上是Replication;第三组中配置Sink从哪一个Channel中取(Task)数据,一个Sink只能从一个Channel中取数据。
下面,根据官网文档,我们展示几种Flow Pipeline,各自适应于什么样的应用场景:
多个Agent顺序连接

可以将多个Agent顺序连接起来,将最初的数据源经过收集,存储到最终的存储系统中。这是最简单的情况,一般情况下,应该控制这种顺序连接的Agent的数量,因为数据流经的路径变长了,如果不考虑failover的话,出现故障将影响整个Flow上的Agent收集服务。
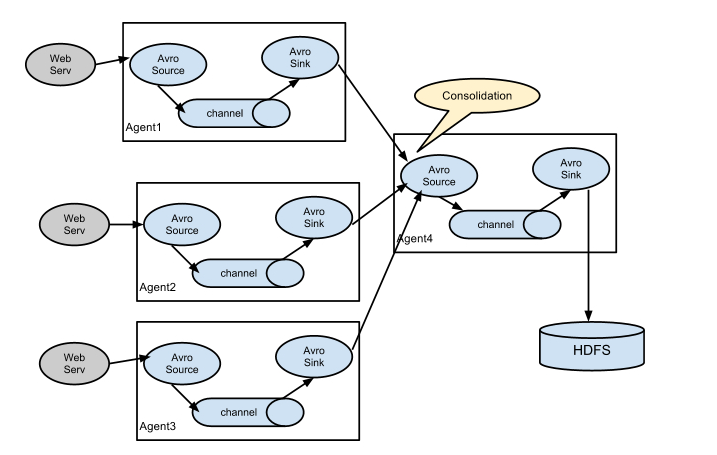
多个Agent的数据汇聚到同一个Agent

这种情况应用的场景比较多,比如要收集Web网站的用户行为日志,Web网站为了可用性使用的负载均衡的集群模式,每个节点都产生用户行为日志,可以为每个节点都配置一个Agent来单独收集日志数据,然后多个Agent将数据最终汇聚到一个用来存储数据存储系统,如HDFS上。
多路(Multiplexing)Agent

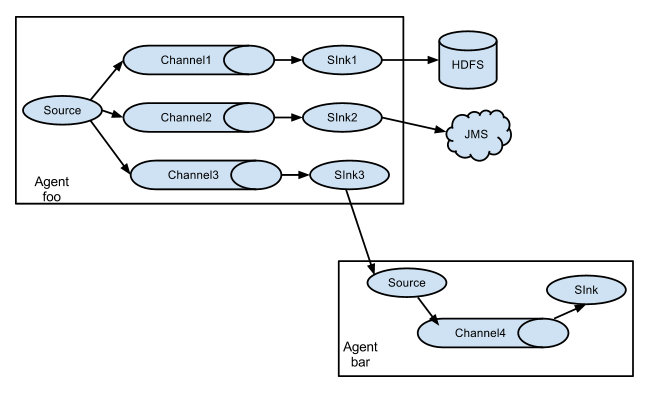
这种模式,有两种方式,一种是用来复制(Replication),另一种是用来分流(Multiplexing)。Replication方式,可以将最前端的数据源复制多份,分别传递到多个channel中,每个channel接收到的数据都是相同的,配置格式,如下所示:
# List the sources, sinks and channels for the agent
<Agent>.sources = <Source1>
<Agent>.sinks = <Sink1> <Sink2>
<Agent>.channels = <Channel1> <Channel2>

# set list of channels for source (separated by space)
<Agent>.sources.<Source1>.channels = <Channel1> <Channel2>

# set channel for sinks
<Agent>.sinks.<Sink1>.channel = <Channel1>
<Agent>.sinks.<Sink2>.channel = <Channel2>

<Agent>.sources.<Source1>.selector.type = replicating
上面指定了selector的type的值为replication,其他的配置没有指定,使用的Replication方式,Source1会将数据分别存储到Channel1和Channel2,这两个channel里面存储的数据是相同的,然后数据被传递到Sink1和Sink2。
Multiplexing方式,selector可以根据header的值来确定数据传递到哪一个channel,配置格式,如下所示:
# Mapping for multiplexing selector
<Agent>.sources.<Source1>.selector.type = multiplexing
<Agent>.sources.<Source1>.selector.header = <someHeader>
<Agent>.sources.<Source1>.selector.mapping.<Value1> = <Channel1>
<Agent>.sources.<Source1>.selector.mapping.<Value2> = <Channel1> <Channel2>
<Agent>.sources.<Source1>.selector.mapping.<Value3> = <Channel2>
#...

<Agent>.sources.<Source1>.selector.default = <Channel2>
实现failover能上面selector的type的值为multiplexing,同时配置selector的header信息,还配置了多个selector的mapping的值,即header的值:如果header的值为Value1、Value2,数据从Source1路由到Channel1;如果header的值为Value2、Value3,数据从Source1路由到Channel2。
实现load balance功能

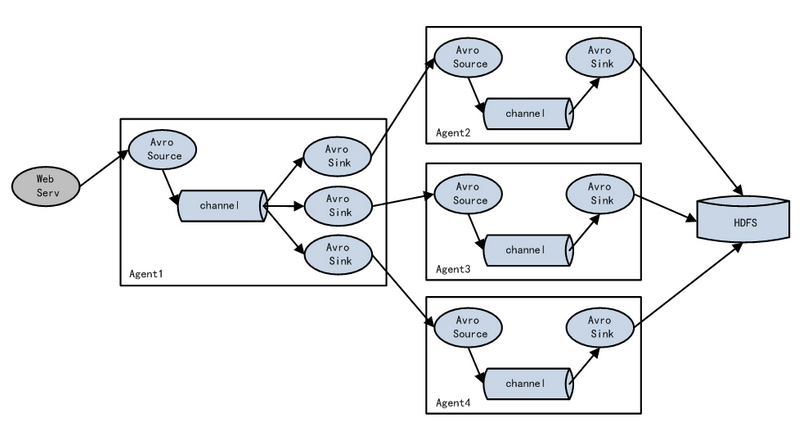
Load balancing Sink Processor能够实现load balance功能,上图Agent1是一个路由节点,负责将Channel暂存的Event均衡到对应的多个Sink组件上,而每个Sink组件分别连接到一个独立的Agent上,示例配置,如下所示:
a1.sinkgroups = g1
a1.sinkgroups.g1.sinks = k1 k2 k3
a1.sinkgroups.g1.processor.type = load_balance
a1.sinkgroups.g1.processor.backoff = true
a1.sinkgroups.g1.processor.selector = round_robin
a1.sinkgroups.g1.processor.selector.maxTimeOut=10000
Failover Sink Processor能够实现failover功能,具体流程类似load balance,但是内部处理机制与load balance完全不同:Failover Sink Processor维护一个优先级Sink组件列表,只要有一个Sink组件可用,Event就被传递到下一个组件。如果一个Sink能够成功处理Event,则会加入到一个Pool中,否则会被移出Pool并计算失败次数,设置一个惩罚因子,示例配置如下所示:
a1.sinkgroups = g1
a1.sinkgroups.g1.sinks = k1 k2 k3
a1.sinkgroups.g1.processor.type = failover
a1.sinkgroups.g1.processor.priority.k1 = 5
a1.sinkgroups.g1.processor.priority.k2 = 7
a1.sinkgroups.g1.processor.priority.k3 = 6
a1.sinkgroups.g1.processor.maxpenalty = 20000
基本功能
我们看一下,Flume NG都支持哪些功能(目前最新版本是1.5.0.1),了解它的功能集合,能够让我们在应用中更好地选择使用哪一种方案。说明Flume NG的功能,实际还是围绕着Agent的三个组件Source、Channel、Sink来看它能够支持哪些技术或协议。我们不再对各个组件支持的协议详细配置进行说明,通过列表的方式分别对三个组件进行概要说明:
Flume Source
| Source类型 | 说明 |
| Avro Source | 支持Avro协议(实际上是Avro RPC),内置支持 |
| Thrift Source | 支持Thrift协议,内置支持 |
| Exec Source | 基于Unix的command在标准输出上生产数据 |
| JMS Source | 从JMS系统(消息、主题)中读取数据,ActiveMQ已经测试过 |
| Spooling Directory Source | 监控指定目录内数据变更 |
| Twitter 1% firehose Source | 通过API持续下载Twitter数据,试验性质 |
| Netcat Source | 监控某个端口,将流经端口的每一个文本行数据作为Event输入 |
| Sequence Generator Source | 序列生成器数据源,生产序列数据 |
| Syslog Sources | 读取syslog数据,产生Event,支持UDP和TCP两种协议 |
| HTTP Source | 基于HTTP POST或GET方式的数据源,支持JSON、BLOB表示形式 |
| Legacy Sources | 兼容老的Flume OG中Source(0.9.x版本) |
Flume Channel
| Channel类型 | 说明 |
| Memory Channel | Event数据存储在内存中 |
| JDBC Channel | Event数据存储在持久化存储中,当前Flume Channel内置支持Derby |
| File Channel | Event数据存储在磁盘文件中 |
| Spillable Memory Channel | Event数据存储在内存中和磁盘上,当内存队列满了,会持久化到磁盘文件(当前试验性的,不建议生产环境使用) |
| Pseudo Transaction Channel | 测试用途 |
| Custom Channel | 自定义Channel实现 |
Flume Sink
| Sink类型 | 说明 |
| HDFS Sink | 数据写入HDFS |
| Logger Sink | 数据写入日志文件 |
| Avro Sink | 数据被转换成Avro Event,然后发送到配置的RPC端口上 |
| Thrift Sink | 数据被转换成Thrift Event,然后发送到配置的RPC端口上 |
| IRC Sink | 数据在IRC上进行回放 |
| File Roll Sink | 存储数据到本地文件系统 |
| Null Sink | 丢弃到所有数据 |
| HBase Sink | 数据写入HBase数据库 |
| Morphline Solr Sink | 数据发送到Solr搜索服务器(集群) |
| ElasticSearch Sink | 数据发送到Elastic Search搜索服务器(集群) |
| Kite Dataset Sink | 写数据到Kite Dataset,试验性质的 |
| Custom Sink | 自定义Sink实现 |
另外还有Channel Selector、Sink Processor、Event Serializer、Interceptor等组件,可以参考官网提供的用户手册。
应用实践
安装Flume NG非常简单,我们使用最新的1.5.0.1版本,执行如下命令:
cd /usr/local
wget http://mirror.bit.edu.cn/apache/flume/1.5.0.1/apache-flume-1.5.0.1-bin.tar.gz
tar xvzf apache-flume-1.5.0.1-bin.tar.gz
cd apache-flume-1.5.0.1-bin
如果需要使用到Hadoop集群,保证Hadoop相关的环境变量都已经正确配置,并且Hadoop集群可用。下面,通过一些实际的配置实例,来了解Flume的使用。为了简单期间,channel我们使用Memory类型的channel。
Avro Source+Memory Channel+Logger Sink
使用apache-flume-1.5.0.1自带的例子,使用Avro Source接收外部数据源,Logger作为sink,即通过Avro RPC调用,将数据缓存在channel中,然后通过Logger打印出调用发送的数据。
配置Agent,修改配置文件conf/flume-conf.properties,内容如下:
# Define a memory channel called ch1 on agent1
agent1.channels.ch1.type = memory

# Define an Avro source called avro-source1 on agent1 and tell it
# to bind to 0.0.0.0:41414. Connect it to channel ch1.
agent1.sources.avro-source1.channels = ch1
agent1.sources.avro-source1.type = avro
agent1.sources.avro-source1.bind = 0.0.0.0
agent1.sources.avro-source1.port = 41414

# Define a logger sink that simply logs all events it receives
# and connect it to the other end of the same channel.
agent1.sinks.log-sink1.channel = ch1
agent1.sinks.log-sink1.type = logger

# Finally, now that we've defined all of our components, tell
# agent1 which ones we want to activate.
agent1.channels = ch1
agent1.channels.ch1.capacity = 1000
agent1.sources = avro-source1
agent1.sinks = log-sink1
首先,启动Agent进程:
bin/flume-ng agent -c ./conf/ -f conf/flume-conf.properties -Dflume.root.logger=DEBUG,console -n agent1
然后,启动Avro Client,发送数据:
bin/flume-ng avro-client -c ./conf/ -H 0.0.0.0 -p 41414 -F /usr/local/programs/logs/sync.log -Dflume.root.logger=DEBUG,console
Avro Source+Memory Channel+HDFS Sink
配置Agent,修改配置文件conf/flume-conf-hdfs.properties,内容如下:
# Define a source, channel, sink
agent1.sources = avro-source1
agent1.channels = ch1
agent1.sinks = hdfs-sink

# Configure channel
agent1.channels.ch1.type = memory
agent1.channels.ch1.capacity = 1000000
agent1.channels.ch1.transactionCapacity = 500000

# Define an Avro source called avro-source1 on agent1 and tell it
# to bind to 0.0.0.0:41414. Connect it to channel ch1.
agent1.sources.avro-source1.channels = ch1
agent1.sources.avro-source1.type = avro
agent1.sources.avro-source1.bind = 0.0.0.0
agent1.sources.avro-source1.port = 41414

# Define a logger sink that simply logs all events it receives
# and connect it to the other end of the same channel.
agent1.sinks.hdfs-sink1.channel = ch1
agent1.sinks.hdfs-sink1.type = hdfs
agent1.sinks.hdfs-sink1.hdfs.path = hdfs://h1:8020/data/flume/
agent1.sinks.hdfs-sink1.hdfs.filePrefix = sync_file
agent1.sinks.hdfs-sink1.hdfs.fileSuffix = .log
agent1.sinks.hdfs-sink1.hdfs.rollSize = 1048576
agent1.sinks.hdfs-sink1.rollInterval = 0
agent1.sinks.hdfs-sink1.hdfs.rollCount = 0
agent1.sinks.hdfs-sink1.hdfs.batchSize = 1500
agent1.sinks.hdfs-sink1.hdfs.round = true
agent1.sinks.hdfs-sink1.hdfs.roundUnit = minute
agent1.sinks.hdfs-sink1.hdfs.threadsPoolSize = 25
agent1.sinks.hdfs-sink1.hdfs.useLocalTimeStamp = true
agent1.sinks.hdfs-sink1.hdfs.minBlockReplicas = 1
agent1.sinks.hdfs-sink1.fileType = SequenceFile
agent1.sinks.hdfs-sink1.writeFormat = TEXT
首先,启动Agent:
bin/flume-ng agent -c ./conf/ -f conf/flume-conf-hdfs.properties -Dflume.root.logger=INFO,console -n agent1
然后,启动Avro Client,发送数据:
bin/flume-ng avro-client -c ./conf/ -H 0.0.0.0 -p 41414 -F /usr/local/programs/logs/sync.log -Dflume.root.logger=DEBUG,console
可以查看同步到HDFS上的数据:
hdfs dfs -ls /data/flume
结果示例,如下所示:
-rw-r--r--   3 shirdrn supergroup    1377617 2014-09-16 14:35 /data/flume/sync_file.1410849320761.log
-rw-r--r--   3 shirdrn supergroup    1378137 2014-09-16 14:35 /data/flume/sync_file.1410849320762.log
-rw-r--r--   3 shirdrn supergroup     259148 2014-09-16 14:35 /data/flume/sync_file.1410849320763.log
Spooling Directory Source+Memory Channel+HDFS Sink
配置Agent,修改配置文件flume-conf-spool.properties,内容如下:
# Define source, channel, sink
agent1.sources = spool-source1
agent1.channels = ch1
agent1.sinks = hdfs-sink1

# Configure channel
agent1.channels.ch1.type = memory
agent1.channels.ch1.capacity = 1000000
agent1.channels.ch1.transactionCapacity = 500000

# Define and configure an Spool directory source
agent1.sources.spool-source1.channels = ch1
agent1.sources.spool-source1.type = spooldir
agent1.sources.spool-source1.spoolDir = /home/shirdrn/data/
agent1.sources.spool-source1.ignorePattern = event(_\d{4}\-\d{2}\-\d{2}_\d{2}_\d{2})?\.log(\.COMPLETED)?
agent1.sources.spool-source1.batchSize = 50
agent1.sources.spool-source1.inputCharset = UTF-8

# Define and configure a hdfs sink
agent1.sinks.hdfs-sink1.channel = ch1
agent1.sinks.hdfs-sink1.type = hdfs
agent1.sinks.hdfs-sink1.hdfs.path = hdfs://h1:8020/data/flume/
agent1.sinks.hdfs-sink1.hdfs.filePrefix = event_%y-%m-%d_%H_%M_%S
agent1.sinks.hdfs-sink1.hdfs.fileSuffix = .log
agent1.sinks.hdfs-sink1.hdfs.rollSize = 1048576
agent1.sinks.hdfs-sink1.hdfs.rollCount = 0
agent1.sinks.hdfs-sink1.hdfs.batchSize = 1500
agent1.sinks.hdfs-sink1.hdfs.round = true
agent1.sinks.hdfs-sink1.hdfs.roundUnit = minute
agent1.sinks.hdfs-sink1.hdfs.threadsPoolSize = 25
agent1.sinks.hdfs-sink1.hdfs.useLocalTimeStamp = true
agent1.sinks.hdfs-sink1.hdfs.minBlockReplicas = 1
agent1.sinks.hdfs-sink1.fileType = SequenceFile
agent1.sinks.hdfs-sink1.writeFormat = TEXT
agent1.sinks.hdfs-sink1.rollInterval = 0
启动Agent进程,执行如下命令:
bin/flume-ng agent -c ./conf/ -f conf/flume-conf-spool.properties -Dflume.root.logger=INFO,console -n agent1
可以查看HDFS上同步过来的数据:
hdfs dfs -ls /data/flume
结果示例,如下所示:
-rw-r--r--   3 shirdrn supergroup    1072265 2014-09-17 10:52 /data/flume/event_14-09-17_10_52_00.1410922355094.log
-rw-r--r--   3 shirdrn supergroup    1072265 2014-09-17 10:52 /data/flume/event_14-09-17_10_52_00.1410922355095.log
-rw-r--r--   3 shirdrn supergroup    1072265 2014-09-17 10:52 /data/flume/event_14-09-17_10_52_00.1410922355096.log
-rw-r--r--   3 shirdrn supergroup    1072265 2014-09-17 10:52 /data/flume/event_14-09-17_10_52_00.1410922355097.log
-rw-r--r--   3 shirdrn supergroup       1530 2014-09-17 10:53 /data/flume/event_14-09-17_10_52_00.1410922355098.log
-rw-r--r--   3 shirdrn supergroup    1072265 2014-09-17 10:53 /data/flume/event_14-09-17_10_53_00.1410922380386.log
-rw-r--r--   3 shirdrn supergroup    1072265 2014-09-17 10:53 /data/flume/event_14-09-17_10_53_00.1410922380387.log
-rw-r--r--   3 shirdrn supergroup    1072265 2014-09-17 10:53 /data/flume/event_14-09-17_10_53_00.1410922380388.log
-rw-r--r--   3 shirdrn supergroup    1072265 2014-09-17 10:53 /data/flume/event_14-09-17_10_53_00.1410922380389.log
-rw-r--r--   3 shirdrn supergroup    1072265 2014-09-17 10:53 /data/flume/event_14-09-17_10_53_00.1410922380390.log
Exec Source+Memory Channel+File Roll Sink
配置Agent,修改配置文件flume-conf-file.properties,内容如下:
# Define source, channel, sink
agent1.sources = tail-source1
agent1.channels = ch1
agent1.sinks = file-sink1

# Configure channel
agent1.channels.ch1.type = memory
agent1.channels.ch1.capacity = 1000000
agent1.channels.ch1.transactionCapacity = 500000

# Define and configure an Exec source
agent1.sources.tail-source1.channels = ch1
agent1.sources.tail-source1.type = exec
agent1.sources.tail-source1.command = tail -F /home/shirdrn/data/event.log
agent1.sources.tail-source1.shell = /bin/sh -c
agent1.sources.tail-source1.batchSize = 50

# Define and configure a File roll sink
# and connect it to the other end of the same channel.
agent1.sinks.file-sink1.channel = ch1
agent1.sinks.file-sink1.type = file_roll
agent1.sinks.file-sink1.batchSize = 100
agent1.sinks.file-sink1.serializer = TEXT
agent1.sinks.file-sink1.sink.directory = /home/shirdrn/sink_data
启动Agent进程,执行如下命令:
bin/flume-ng agent -c ./conf/ -f conf/flume-conf-file.properties -Dflume.root.logger=INFO,console -n agent1
可以查看File Roll Sink对应的本地文件系统目录/home/shirdrn/sink_data下,示例如下所示:
-rw-rw-r-- 1 shirdrn shirdrn 13944825 Sep 17 11:36 1410924990039-1
-rw-rw-r-- 1 shirdrn shirdrn 11288870 Sep 17 11:37 1410924990039-2
-rw-rw-r-- 1 shirdrn shirdrn        0 Sep 17 11:37 1410924990039-3
-rw-rw-r-- 1 shirdrn shirdrn 20517500 Sep 17 11:38 1410924990039-4
-rw-rw-r-- 1 shirdrn shirdrn 16343250 Sep 17 11:38 1410924990039-5
有关Flume NG更多配置及其说明,请参考官方用户手册,非常详细。
参考链接